 Lot Projects
| Document Version | v.3 |
|---|---|
| Document Last Updated | 2/13/2024 |
| Software Version Documented | 9.9.2 |
Overview
In this document, the concepts and processes of Lot Projects and their uses will be discussed.
Lot Billing allows a distributor to manage quoting, delivery, and billing for both the customer and vendor sides of a Lot Billed Order. Quotes to Sales order for the customer including all the items for the construction project can be linked to the RFQs converted to the PO. Once linked, the POs can be received as items are delivered to the project site, and the delivered items can be invoiced to the customer. The open items continue to be tracked on the POs and the linked sales order.
Terms:
Lot Project: An item type with functionality useful for projects. This Item Type is added as the first line/parent in the project where the Lot Project Items and Part Numbers are added under the project. The manufacturer will always be SENI (Savance Enterprise Non Inventory). This typically represents the Job or the Project Name.
Lot Project Item: The child of a Lot Project. This can be seen as different milestones or sections of the project, typically coordinated with the Purchase Order of the Vendor you are ordering the product from. Individual line items/part numbers are child lines of Lot Project Items when they are used.
Non Itemized Costing: When the cost is defined on the Lot Project Item level and is considered the cost of all individual line items under that lot project item.
Itemized Cost: When the cost is defined on the individual line item level under the parent lot project item and the total cost is shown on the parent Lot Project Item. Costs are defined like normal, through price profiles or manually entered.
General Concepts
-
The concepts and processes of Lot Projects and their uses will be discussed. Lot Projects are ideally used for large dollar amount projects that involve all aspects of the project. For example, everything needed to purchase to build a house or everything needed to purchase commercial or industrial electrical, plumbing, or lighting projects.
-
Linked purchase orders are made per lot project item. As vendors give their quotes, the price is updated in the PO but also in the Project Sales Order’s cost. The set margin for each line item updates the grand total for the order as costs are updated/added. This can be helpful during negotiations with customers and vendors.
-
There are 2 lot item types. Lot Project and Lot Project Items
-
Lot Project: An item type with functionality useful for projects. This item code is added as the first line/parent in the project where item codes are added under the project. The manufacturer will always be SENI (Savance Enterprise Non Inventory).
-
The Net amount is set at the lot project level, this can be helpful when quoting an estimate.
- Cost field is read only but will update upon PO creation
Add New Lot Project Within a Quote
-
Enter the part number that represents the Lot Project and Description if necessary.
-
Scroll over to the NSB Type column select Lot Project.
-
Be sure the NSB (non stock build) checkbox is checked, but automatically checks.
-
The line number will turn dark blue.
-
Under the Lot Project you would add the Lot Project Item.
-
Lot Project Item: The child of a Lot Project. This can be seen as different milestones or sections of the project. Then individual line items/products are child lines of lot project items.
Add New Lot Project Item Within a Quote
-
Choose a mfg.
-
Enter the part number for the lot project item and enter the description.
-
Scroll over to the right and in the NSB Type column select Lot Project Item.
-
Be sure the NSB (non stock build) checkbox is checked.
-
The line number will turn light blue.
-
An order can have as many Lot Projects or Lot Project Items as needed.
-
Under the lot project items come the actual part numbers. These are essentially the breakdown of the Lot Project Items. The cost structure can be Itemized or non itemized.
-
Non Itemized Costing: When the cost is defined on the Lot Project Item level and is considered the cost of all individual line items under that lot project item.
-
For Non Itemized costing, be sure the Itemized checkbox is unchecked. Then you would just set a total cost on the Lot Project Item line.
-
For example, you could have a deal with a vendor and they quote you one lump sum of their bill but don't want to list the cost of the individual items.
-
-
Itemized Cost: When the cost is defined on the individual line item level under the parent lot project item, and the total cost is shown on the cost on the parent Lot Project Item. Costs are defaulted like normal, through price profiles or manually entered.
- For Itemized Costing you would need to check the “Itemized” checkbox on the lot project item line and costs will show as each individual item is added.
-
Typically, the Lot Project Items will be by Manufacturer (mfg) and vendor and each part number under that parent will all have the same mfg and vendor. But they can function with different mfg and vendors.
- However, the vendor listed on the lot project item will be the Vendor for the Purchase Order for all the child items under it.
-
If you have some common items that are typically included in a project they can be added ahead of time. But sometimes there are unique parts needed. You can quickly add a new non-stock build (NSB) items to the parent as a new part number.
-
To add a new non-stock item within the quote, pick a blank line under the desired lot project item and type in the desired part number and press tab and enter the description, press tab again.
-
Click the NSB for Non Stock Build, and then the mfg will default to the mfg for its parent lot project item. This adds a new part number to the system as a non stock item.
-
-
In this screenshot, notice line 1 is the Lot Project, Line 2 is the Lot Project Item, then lines 3 and 4 are the individual part numbers. Notice that this group has non itemized costing and the price is only listed on the parent lot project item.

-
Whereas line 5 is a second Lot Project Item with its group of part numbers. They are itemized because the cost is listed for each part number and totaled on the parent lot project item.
-
Most checkboxes are locked for the individual part numbers by their parent lot project item:
-
Line Item Hold
-
Taxes
-
Ship Complete
-
B/O
-
Direct
-
PO Now
-
Ship & Bill
-
Rebatable
-
Store
-
-
However individual lot project items can be BO, Stored, or Direct on the line level.
-
Notice the Lot Project line checkboxes for LIH and S Tax are enabled but the lines below are disabled.

Creating an Order with a Lot Project/s
-
To start a new quote for a project using Lot Project functionality, begin by entering the customer.
-
Typically a Job is created for projects like this and is added to the header. This job can be named the same thing as the Lot Project. This is for reporting purposes using the Customer Job Information Report. Those details will be mentioned later in this document.
-
Checkmark the BO check box in the header (if not BO, whole orders can be Storage orders or Direct orders too). Add the Lot Project code as the first line item. The line number will turn a dark blue.
-
You may enter the Net Amount, this can be an estimate at this point.
-
For line 2, add the Lot Project Item. Once added, the line number will turn light blue.
-
For the next lines, add the individual part numbers that are included in the project.
-
To make these itemized, check the Itemized checkbox and the prices will auto populate.
- If there is no default cost for an item, it will be zero, but you can add it manually.
-
-
Notice the cost in the lot project item parent refreshes.
-
To add a new non-stock item within the quote, start a new line and type in the desired part number, press tab and add the description.
-
Click the NSB for Non Stock Build, and then the mfg will default to the mfg for its parent lot project item. This adds a new part number to the system as a non stock item. You can change the mfg if needed.
-
If necessary, add a second lot project item or even another lot project parent.
-
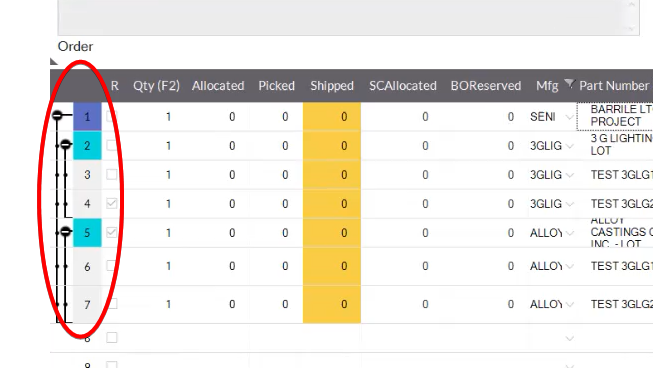
Notice the brackets connecting the parents to the children.
-
You can also click the main node to minimize the children of the parents (minus button, when clicked turns into a plus button).
Inserting, Deleting, Detaching Rows
-
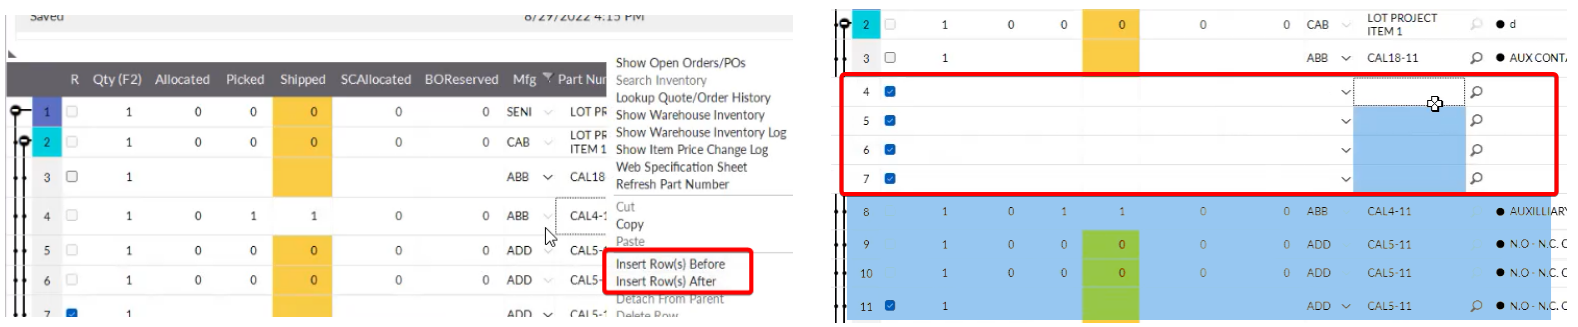
If you need to insert an additional item under a specific parent line, you can right click on a row and click either Insert Row(s) Before or Insert Row(s) After.
-
If you highlight/select multiple rows and insert rows, the same number of highlighted rows will appear depending on where the rows were highlighted and which Insert option you chose.
-
If you need to move a child part number line from one Lot Project Item to another, you will need to delete the line and insert a new line under the correct lot project item and add it back.
-
You can also right click on a line and delete it.
-
Lot Projects can not establish a parent child relationship directly to item codes, there must be a lot project item between them.
-
Lot project items can exist without a parent lot project and still have a parent child relationship with item codes under it.
-
If you need to detach an item from a parent you can right click on the line item and click Detach From Parent.
-
If the itemized box is checked, as you add item codes under the lot project item, the total cost refreshes.
-
To change to Non itemized, just uncheck the itemized box, then set a total cost on the lot project item.
-
You can also change the net or even the margin as needed.
Freight Indicators - Freight Allowed
For an indepth look at Freight Indicators, please refer to this document: Freight Indicators for Lot Projects - Process Doc
-
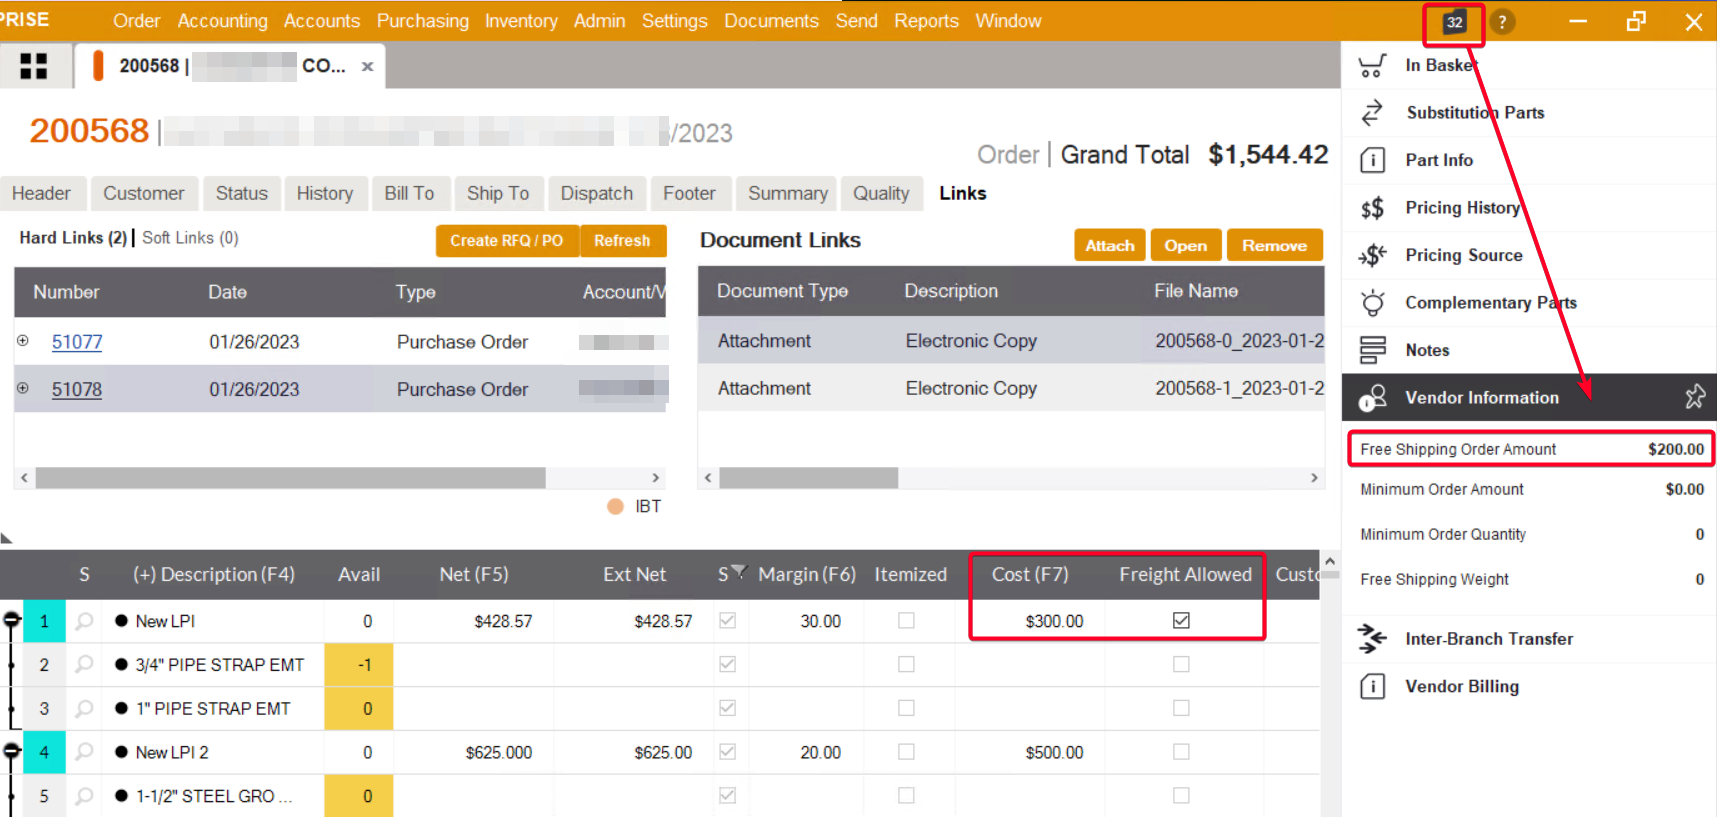
Depending on the total cost of a lot project item, the “Freight Allowed” box will be checked for that line.
-
If the total cost of a lot project item meets or exceeds the “Free Shipping Order Amount” set for that vendor, the box will be enabled and checked, by default.
-
If the free shipping order amount is set to zero, the box will always be enabled and checked.
-
If the “No Free Shipping Order Amount” box is checked in the Manage Vendor screen (in the Account Info Tab), the free shipping order amount field will be disabled.
- This setting is managed in the Manage Vendor screen in the Account Info tab.
-
-
Once you convert the quote to an order, you can always unlock and change the freight allowed box if desired, at any time (given that the “No Free Shipping Order Amount” setting is OFF).
Freight Indicators - Customer Pays Freight
-
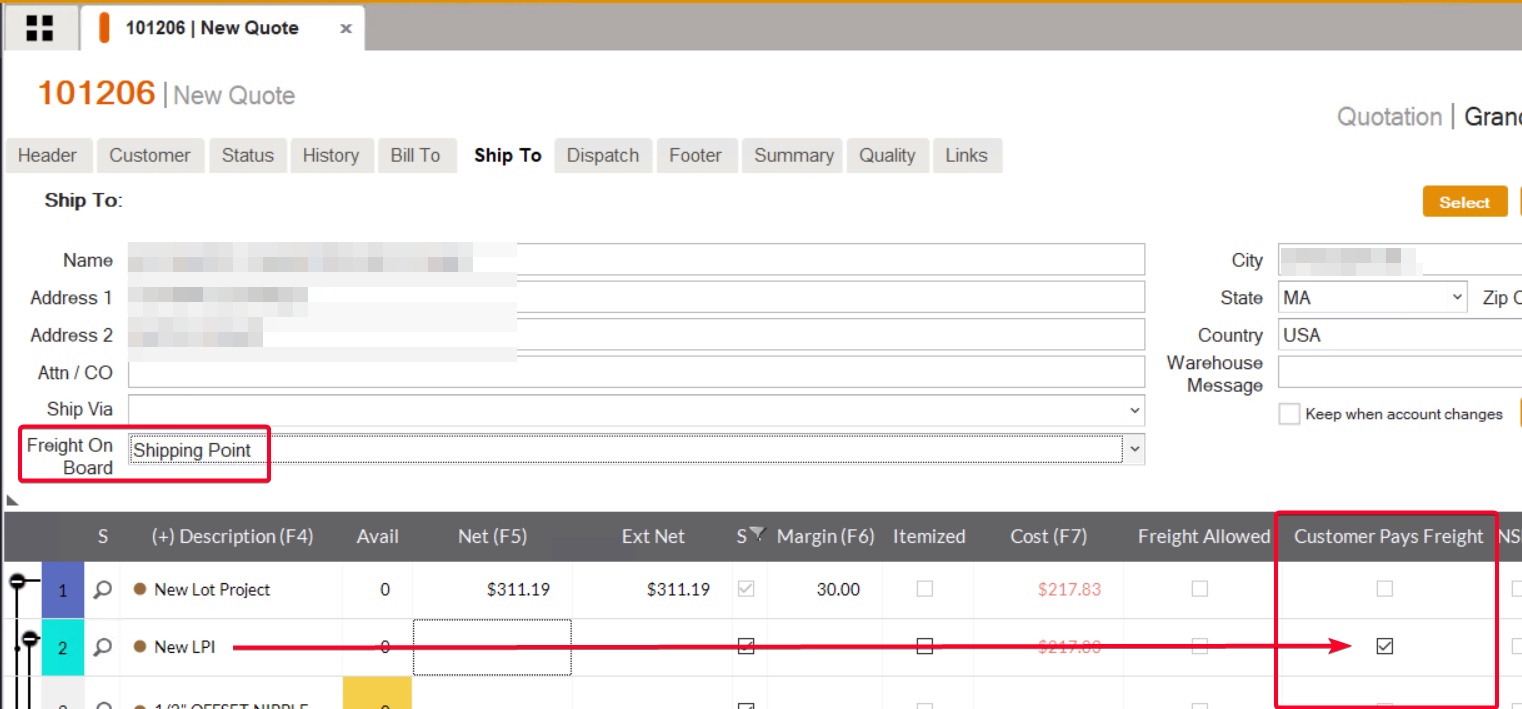
Depending on the F.O.B. setting on the Ship To tab, the Customer Pays Freight box for lot project item lines will default to checked or unchecked.
-
Shipping Point = Checked
-
Destination = Unchecked
-
The Customer Pays Freight checkbox is always enabled (lot project items only), so it can be changed at any time before the creation of the PO’s bill/s.
-
To change, you will need to open the order and unlock it. The checkbox will be enabled and you either manually check/uncheck the box or change the F.O.B. for the entire order on the Ship To tab.
-
This column does not exist on POs.
-
-
When ready, convert it to an Order.
-
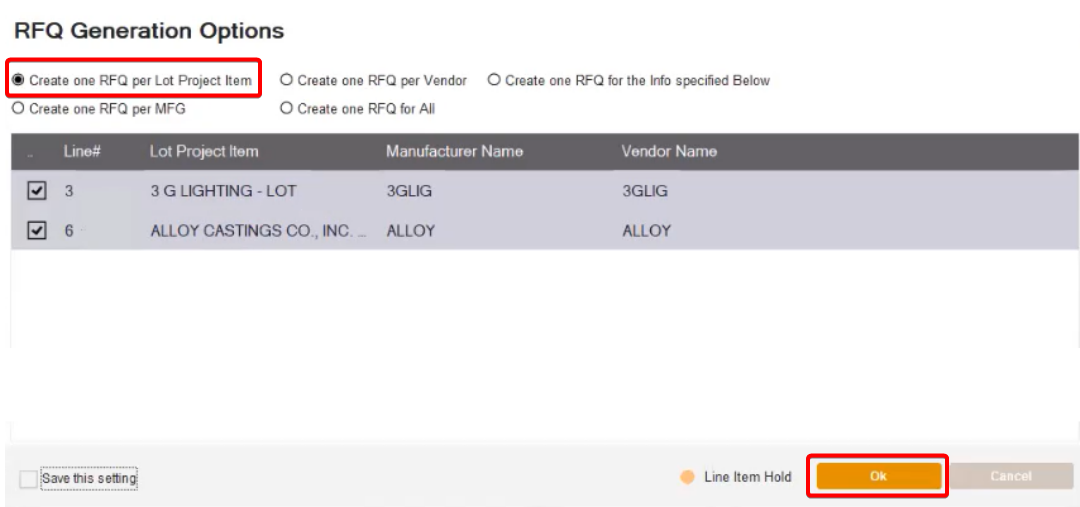
When ready to create POs for this project, open the Links tab and click Create RFQ/PO
-
When Lot Project Items are present in an order, the only option is to create one PO per Lot Project Item, which is selected by default. Notice in this example, there will be 2 POs since we added 2 lot project items.
- If you select “Direct” the POs will be created upon converting the order.
- If you select “Direct” the POs will be created upon converting the order.
-
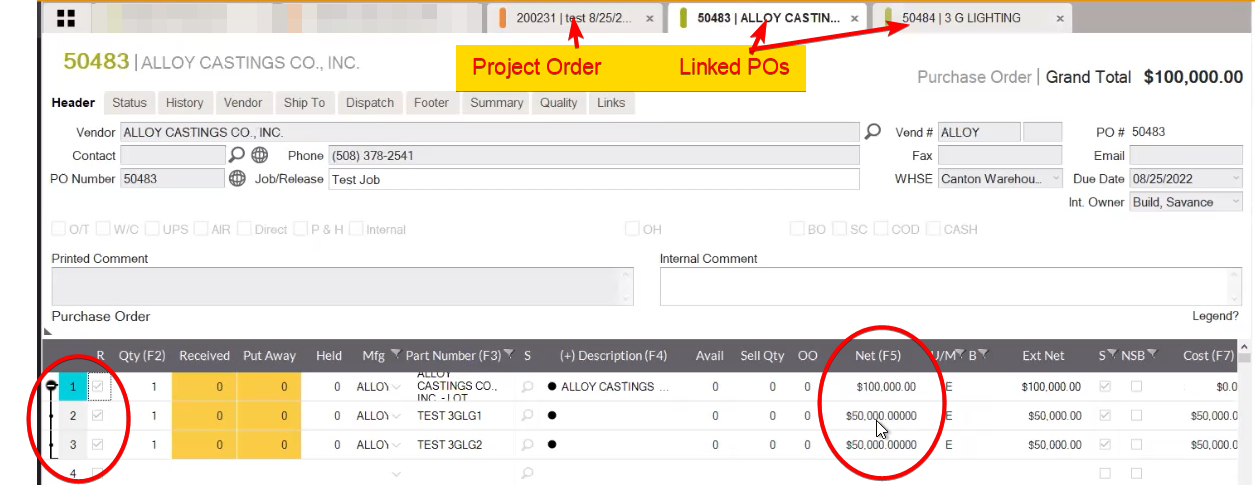
Once the POs are created, they will open. Click on the tab to view the PO.
-
Because they are linked, any changes made in the POs will propagate to the Order and vice versa. Such as changing the items to itemized or normal. Or even adding/deleting part numbers. Any change made to either the order or the corresponding PO,( depending on what lot project item) will reflect on both sides.
-
When the POs are ready to receive, pull up the PO and open the receiver. As you receive, the Back order screen will appear and list the order for the project.
-
When ready to deliver the items to the customer pull up the Order and open the shipper. Process the shipper like normal.
Note for Receiving Items for Storage Orders
-
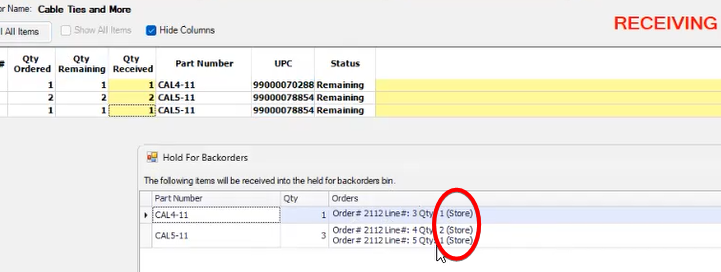
If the Order also has “ST” (Storage) checkmarked, and then a linked PO is created, and if an entire receiver is for items linked to a storage order**,** you only receive directly to “Store”.
-
In the Receiver, click Fill All Items.

-
Then upon clicking Post, the only option is to click Received/Stored.
-
The Hold For Backorders screen shows what lines are for storage orders. This example shows the entire receiver is for a BO storage order.

-
Also, if the entire storage order has been received in a linked PO, the stored shipper for the order will automatically be created.
-
You will need to complete the storage shippers like normal in the release management screen.
- For more information on Storage shippers you can view this document:
Creating Bills and Invoicing
-
When you receive the vendor bill, go to Accounts Payable and then Enter Bills.
-
You can search for the PO # and expand it to view the receivers, Lot Project Items, and the part numbers.
-
Notice the Freight Indicators in the System Notes column. These messages are based on how the “Freight Allowed” and “ Customer Pays Freight” boxes are checked on the Order.
-
Notice the blue “i” icon, when hovered over with the mouse, it shows the Vendor Information (helpful for Free Shipping Order Amount and the Freight Allowed/Freight Not Allowed message)
-
If the costing is NOT itemized, the line items will show a cost of zero, with the total cost showing only on the lot project item.
-
As you checkmark the PO line, all the items and the Lot Project Item line will check too.

-
The Lot Cust. Inv column refreshes to show it’s part of the final invoice charged to the customer (based on the margin), as well as how much is left to invoice.
- In this example, the cost is $200, the margin is 30%, so the customer will be invoiced $285.72 for this part of the project. Which has $714.29 left to invoice.
-
But for POs for lot project items with ITEMIZED costing, the enter bills screen does not list the lot project item, it lists the part numbers and each cost. And as they are checked off, the Lot Cust. Inv column shows that item’s portion of the that portion of the project with the margin applied.

Adding Freight To Sales Order
-
Freight and other charges can be added on the Enter Bills screen, or on the Sales Order or Purchase Order itself.
- If entered on the order, it can be Detached From the Lot Project Parent relationship by default but you can attach it if desired.
-
Then when entering the vendor’s bill, right click on the PO, and click Add Freight.
-
Choose taxable or non taxable and the freight line will be added.
-
Enter the cost of freight, and if you want to charge the customer for freight too, enter that in the Net Cust column next to the freight amount.
-
Notice the amount is added to the total on the PO line.
-
Click Create Bill and proceed.

-
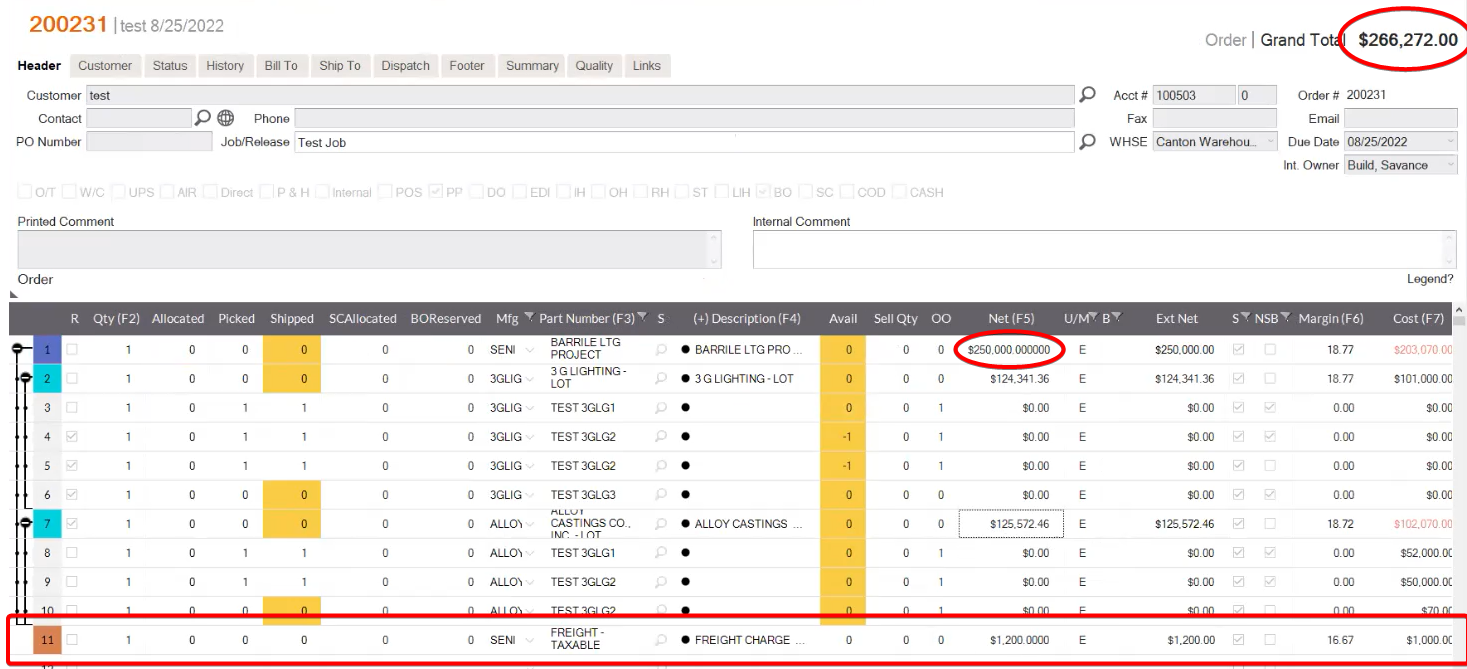
Back on the Order, notice the grand total refreshes.
-
The freight line is added but is not a child of the Lot Project nor the Lot Project Item.
-
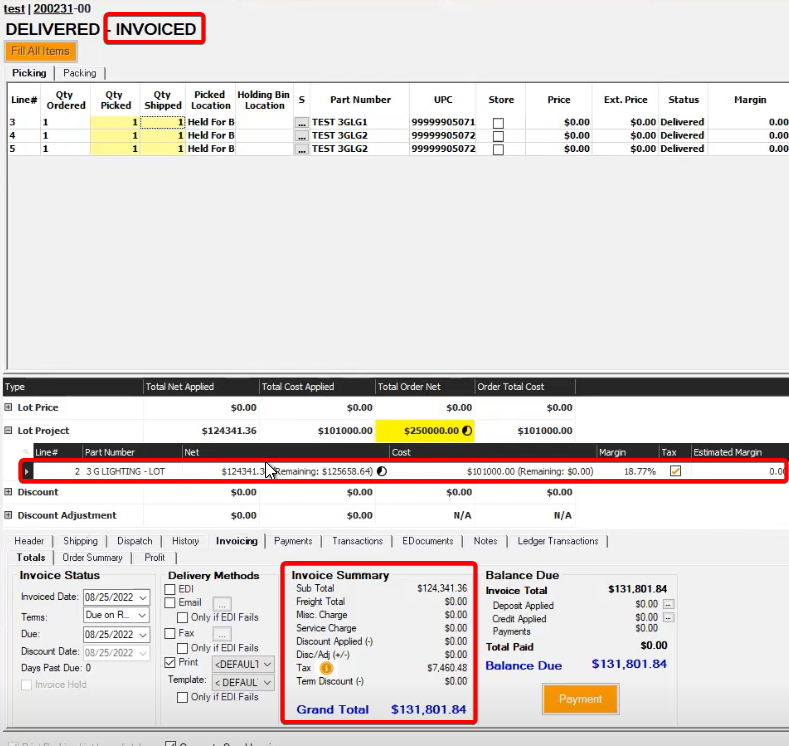
If you have already processed the shipper for those items (or for Stored shippers), this will also auto invoice the shippers.
-
Unless you have auto invoicing turned off
-
Unless it is on invoice hold
-
-
If you have not processed the shippers, you will need to manually invoice them once they’re shipped.
Adding Freight as a Cost to Sales Order for Lot Project Job Only
At times, there may be freight that is not added at the Vendor Billing of the Purchase Orders for the product purchased for the Lot Project. It may be for shipping by an outside carrier, like UPS, Fed Ex, etc. that you or the vendor has used and not billed you for on any of those Purchase Orders that you have received. But you have received this bill separately and you are NOT charging the Customer.
First refer to Freight - Process Doc on creating a Freight Type Part Number, naming it FREIGHT COST TO JOB. You can create two - NON-TAXABLE and TAXABLE with checkmarks accordingly. This process assumes that you have freight items set up in the item file. These items must be the item type “freight” and be a Savance Enterprise Non Inventory Item (SENI). the order. As is mentioned in the estimated freight section above, as soon as estimated freight is applied to the invoice it becomes actual freight.
-
Open the Sales Order. History>Unlock Order
-
Open Shipto Tab. Verify that Freight On Board indicates that it is Pre-Paid Allowed, meaning that the customer does not pay for this freight charge however is to be charged to Job Sales Order Cost.
-
Go to the last line in order.
-
Enter the part number “FREIGHT COST TO JOB”
-
Right click on this line and click detach from parent. Save.
-
This will NOT add to the PURCHASE ORDERS
-
Enter vendor name and Po number in comment field of “FREIGHT COST TO JOB” line.
-
Click save.
-
When this box appears click cancel.
-
Click Status tab and then Release Management button. Release Management screen Will open.
-
Enter qty 1 in Quantity to Release box of the item “FREIGHT COST TO JOB” hit enter.
-
Click Allocate shipper button at the bottom left of screen.
-
This brings you back to the main order screen. Click the newly created (blue) “Normal Shipper.
-
This opens the shipper, Click the “Fill All Items” button and select “ship all items”.
-
Click the Billing button at the top right which pops up this screen.
-
Click on the F of “Freight – Non Taxable enter the freight cost in the cost box, hit enter
Invoice Profit Percentage and Lot Project Orders
-
A way to invoice the customer for the full bill even if you haven’t been fully billed by the vendor is to use Invoice Profit Percentage (Inv Prof %).
-
In the order, you can manually set the Inv Prof % to the Lot Project line only. Once you enter the Inv Prof %, it will be applied to the rest of the child lines.
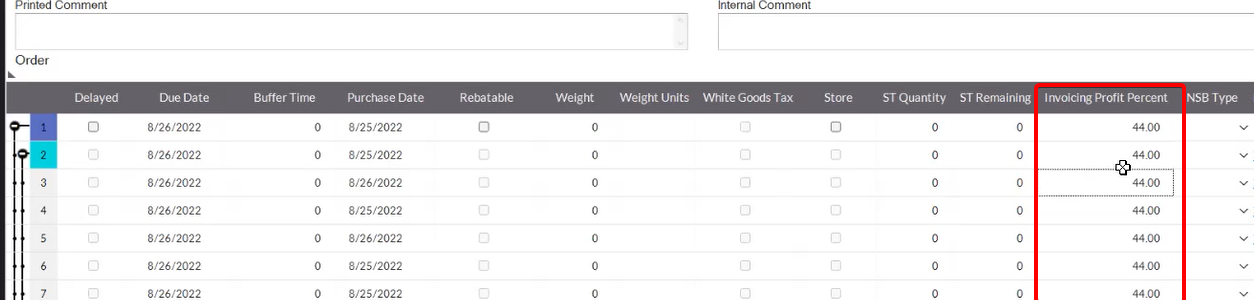
-
Once the shipper is delivered and invoiced, the invoice total will be based on the Inv Prof % if it is higher than the margin.
-
Formula and Logic:
- If Invoicing Profit Percentage > 0
Amount Invoiced to Customer = Vendor Bill Cost / ((100 - Invoicing Profit Percentage) / 100)
- If Invoicing Profit Percentage = 0
Amount invoiced to Customer = Vendor Bill Cost / ((100 - Lot Project Margin) / 100)
- So if the Invoice Profit % is high enough, the first invoice you send out could be for the entire amount and any other shippers will be invoiced at zero, since there’s nothing left to invoice.
Vendor Billing in the In Basket
-
As Vendor Bills are created, and Customer Invoices are created, the Lot Project and Lot Project Items can be highlighted in the row and the Vendor Billing tab in the In Basket can show all the detail of PO#, Bill#, Invoice#, Invoice Date, and Amount Billed.
-
PO# and Bill# can be hyperlinked to for further detail

-
Open an Order that has a Lot Project with their multiple Lot Project Items.
-
Highlight the Lot Project
-
Over to the right under Vendor Billing you can see the detail of the overall Cost Total of the Lot Project and all Lot Project Items underneath with their respective POs and Bills with their Invoice #s,Dates, and Amount Billed
-
Highlight an individual Lot Project Item
-
Over to the right under Vendor Billing you can see the detail of that Lot Project Item’s info.
-
Purchase Orders and Bills can be hyperlinked to for further detail.
-
Customer Job Information Report
-
A helpful way to track projects is to create jobs for the projects and then use the Customer Job Information Report to track it.
-
Job Tip: If you have processed an order all the way through to invoicing, but never added the job, you can still do so.
-
Open the order and unlock it.
-
Add the job either by selecting an existing one or making a new one.
-
The system will ask if you want to refresh, click No.
-
Save the Order.
-
Then the order will show on this report under that Job.
- It will also show up under that job in the Open Invoices screen if it’s already been invoiced.
-
-
Select the job and customer and run.
-
Open Cost shows what is left to be billed
-
Open Sales shows what is left to be invoiced
-
Vendor Billed is what has already been billed
-
Customer Invoice shows what has been invoiced
-
Freight In is freight charged by the vendor
-
Freight Out is freight invoiced to the customer
Returns for Lot Project Orders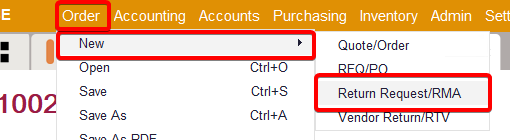
-
If you have received a product and shipped it to the customer and it turns out you need to do a return, you would start by opening the Order to view the lines to be returned.
-
Then in the top menu, click Order, New, and select Return Request to start a standalone return.
- Avoid using the Return Order button on the order since it will be loading every line item on the order into a new return and this is not ideal for most scenarios.
-
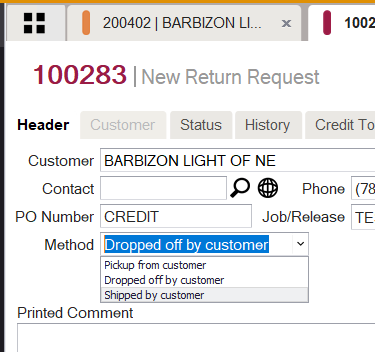
Enter customer and other header info.
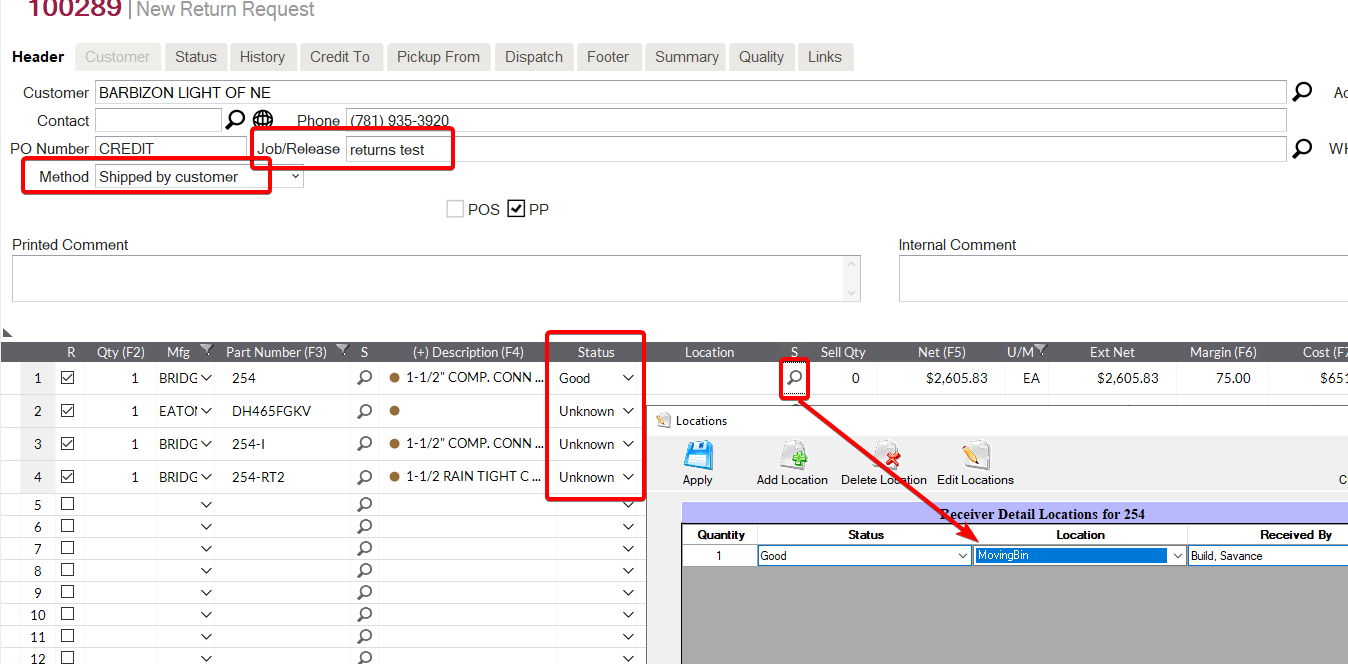
-
Choose the method by which the returned product will be received.
-
With your Order Open, copy the Job and then paste it into the new Return Request. This is how the order and return will reference each other.
-
If your lot project parent is the same name as the job, copy the lot project part number and paste it to the job field on the return.
-
You can also click the spy glass button for the job in the return and select the job, just be sure you are selecting the correct job.
-
-
-
Then back on the order, find the lines that need to be returned and copy and paste them on the return.
-
Do NOT copy and paste the lot project item itself. Only the actual line items.
-
If there are several lines in a row that need to be copied you can highlight the part number on the first line.
-
Then hold the mouse and drag the selection down to the last line (like when highlighting multiple rows in Excel) and right click, click copy (or press ctrl+c).
-
Then paste on to the next blank part number in the return. Each line that was highlighted will paste into the return.
-
-
You can mark the condition of the goods as good, bad, or unknown if you know that yet:
-
Note the location the items will be in when received depending on the condition/status:
-
Good > Moving Bin
-
Bad or Unknown > Suspect On Hand
-
-
-
Make changes to the net amounts as needed, depending on negotiations.
-
When ready, convert to an RMA.
-
When ready, receive the RMA (depending on the method chosen in the header, it may be received and credit automatically).
-
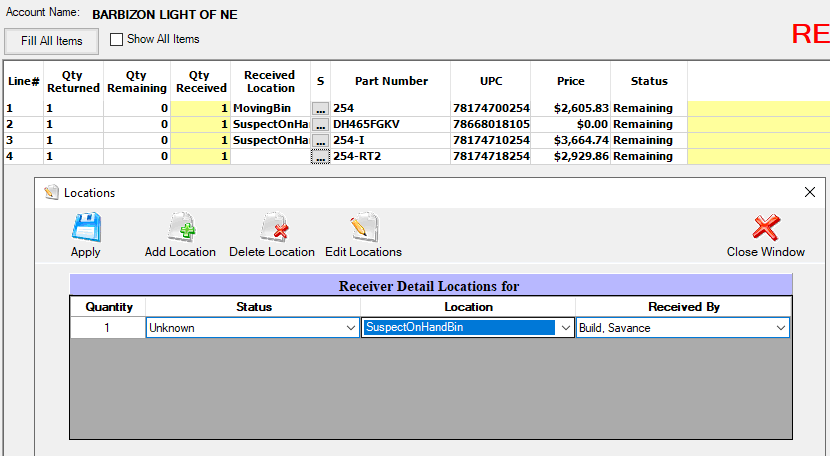
If needed, process the receiver. You must choose the receiving location for each line, depending on the status of the goods.
-
Post to Receiving or Received when ready.
-
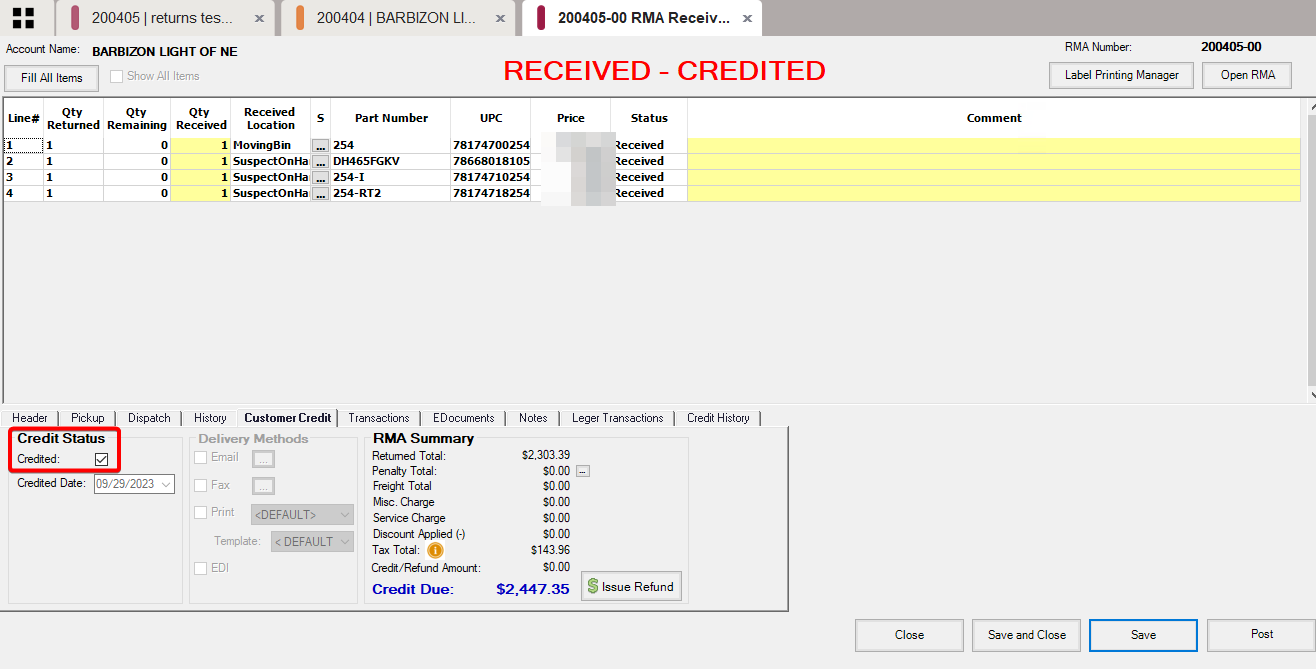
If it didn’t auto credit, you will need to check the credited box when ready.
-
The status of the receiver will say “Received - Credited” when processed.
-
The credit is ready to be applied to the order.
-
Applying Credit to Order
-
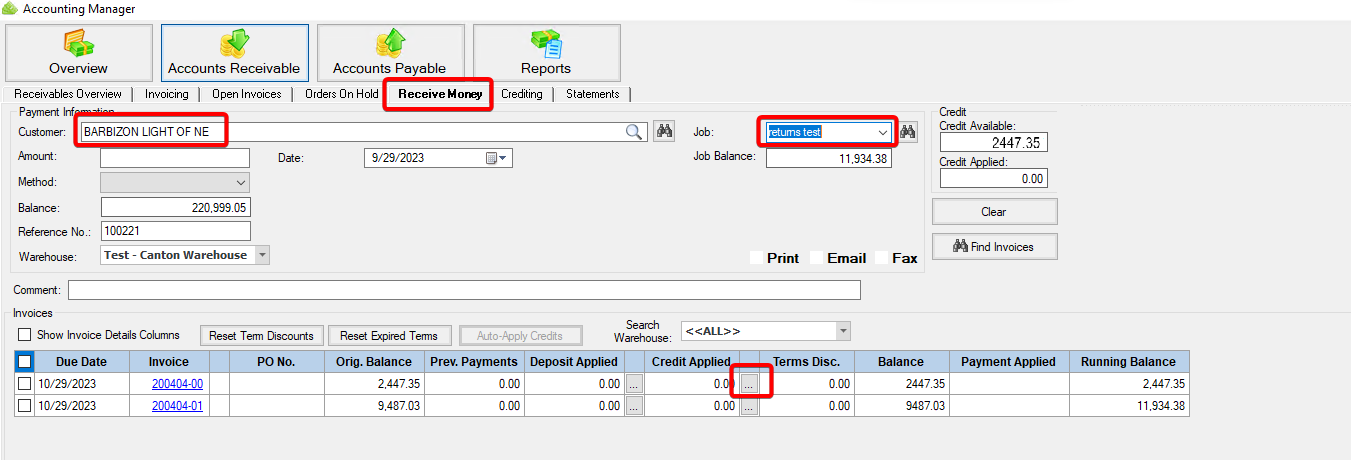
When ready to apply the credit to the invoice, access the Receive Money screen and enter the Customer.
-
Choose the correct Job, and invoices under that job will appear.
-
The following are broad details on how to apply a credit to invoice, more details can be found in the document called “Return Merchandise Authorization - Core Process.”
-
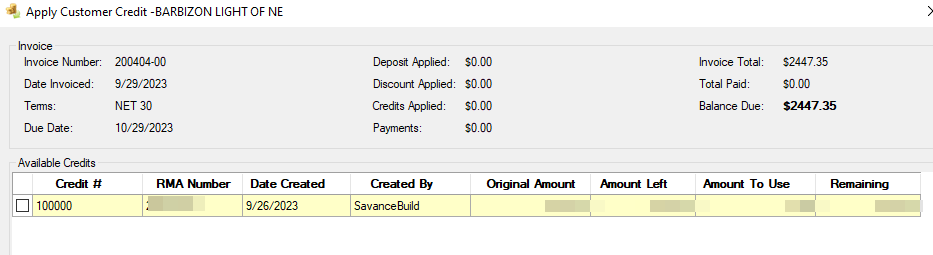
Find the appropriate invoice and click the “...” button in the Credit Applied column.
-
Choose the RMA credit to apply and click OK
-
That amount will be applied to the invoice.
-
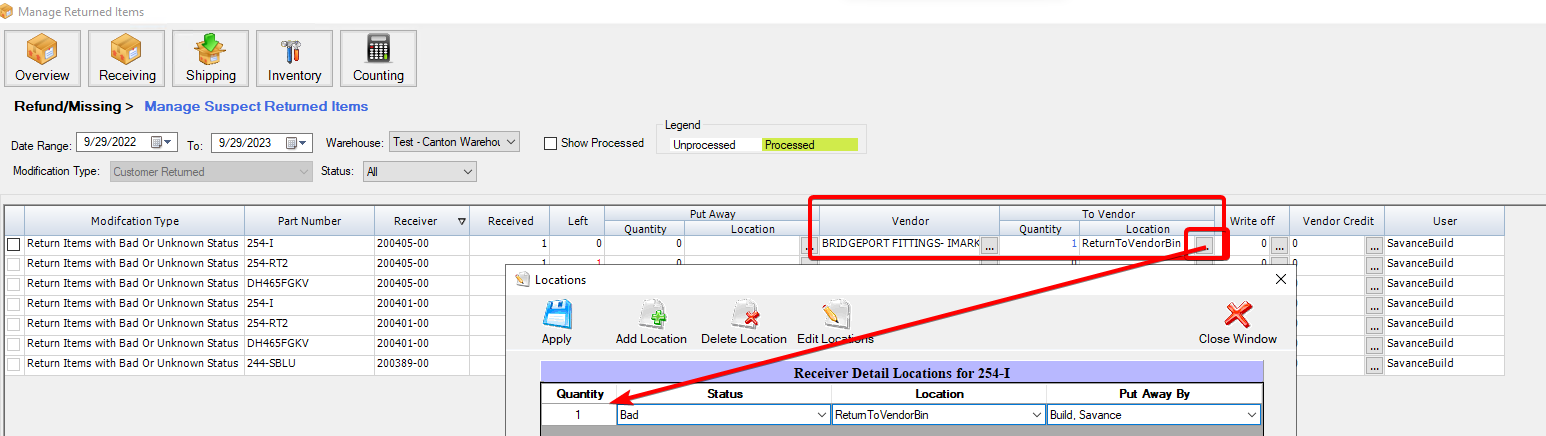
The items will need to be processed in the Manage Suspect On Hand screen. This can also start the Vendor Return process. Please see steps for this in the document called “Return Merchandise Authorization - Core Process” in the Manage Suspect Returned Items section.
- This is the location where the returned items go when received. You can put away, write off, or start a Vendor Return from this screen.
- This is the location where the returned items go when received. You can put away, write off, or start a Vendor Return from this screen.